Pagina 6 di 17 PrimaPrima ... 4567816 ... UltimaUltima
Risultati da 51 a 60 di 166

Discussione: DONNA-cardigan-maglie-giacche-golfini

  1. #51
    L'avatar di Lo Staff
    Lo Staff è offline Moderatrice
    Data Registrazione
    11-12-2011
    Messaggi
    17,463
    Grazie
    0
    Ringraziato 14,960 volte in 6,540 Discussioni

    Predefinito

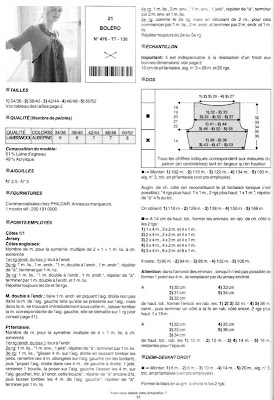
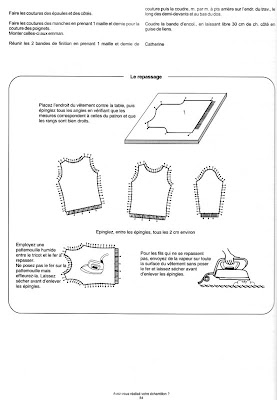
    Ecco tre schemi in francese, ma molto facili da realizzare....

    Ultima modifica di mammagiulietta; 22-06-2012 alle 16:35

  2. #52
    L'avatar di Lo Staff
    Lo Staff è offline Moderatrice
    Data Registrazione
    11-12-2011
    Messaggi
    17,463
    Grazie
    0
    Ringraziato 14,960 volte in 6,540 Discussioni

    Predefinito


    PUNTO LEGACCIO (in tondo sul ferro circolare):
    1 giro dir, 1 giro rov.
    --------------------------------------------------------

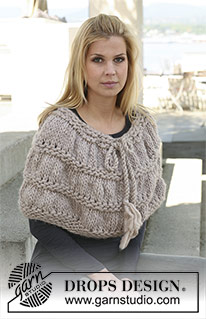
    PONCHO/SCALDASPALLA:
    Avviare 68-88 m con il ferro circolare 15 e con filo Polaris. Lavorare 6 giri punto legaccio – ved spieg sopra! Continuare con il filo Eskimo (continuare con il ferro circolare 15). Lavorare il giro seguente così: * 1 m dir, 1 gettato *, ripetere da *-* tutto il giro (i gett si lavorano a dir ritorto al giro seguente, per evitare un buco) = 136-176 m. Lavorare 5 giri dir. RICORDATI LA TENSIONE DELLA MAGLIA! Continuare con il filo Polaris. Lavorare il giro seguente così: Lavorare insieme a dir tutte le m, 2 m alla volta = 68-88 m. Lavorare 1 giro rov, 1 giro dir, 1 giro rov.

    Continuare con il filo Eskimo. Lavorare il giro seguente così: * 1 m dir, 1 gett *, ripetere da *-* tutto il giro = 136-176 m. Lavorare 5 giri dir. Continuare con il filo Polaris, poi lavorare tutte le ma insieme a dir, 2 m alla volta = 68-88 m. Lavorare 1 giro rov. Lavorare il giro seguente così: * 6 m dir, 2 m insieme a di *, ripetere da *-*, terminare con 4-0 m dir = 60-77 m. Lavorare 1 giro rov.

    Continuare con il filo Eskimo. Lavorare il giro seguente così: * 1 m dir, 1 gett *, ripetere da *-* tutto il giro = 120-154 m. Lavorare 5 giri dir. Continuare con il filo Polaris, poi lavorare tutte le ma insieme a dir, 2 m alla volta = 60-77 m. Lavorare 1 giro rov. Lavorare il giro seguente così: * 5 m dir, 2 m insieme a dir *, ripetere da *-*, terminare con 4-0 m dir = 52-66 m. Lavorare 1 giro rov. Intrecciare a dir. Il lavoro misura ca 37-37 cm.

    Corda attorcigliata:
    Tagliare 2 fili Eskimo ognuno di ca 4 metri. Attorcigliarli finché non facciano resistenza, piegare la corda in 2 e si attorciglierà di nuovo. Fare un nodo ad ogni estremità. Infilare la corda in mezzo della parte punto legaccio in alto, su e giù 2 m.
    Indice video DROPS: Circular needle - around in garter st
    Indice video DROPS: Circular needle - around in stockinette
    Indice video DROPS: Twisted string

  3. #53
    L'avatar di Natalia
    Natalia è offline Moderatrice
    Data Registrazione
    19-06-2009
    Località
    Cagliari
    Messaggi
    19,665
    Grazie
    10,426
    Ringraziato 18,785 volte in 7,088 Discussioni

  4. #54
    L'avatar di Lo Staff
    Lo Staff è offline Moderatrice
    Data Registrazione
    11-12-2011
    Messaggi
    17,463
    Grazie
    0
    Ringraziato 14,960 volte in 6,540 Discussioni

    Predefinito

    ------------------------------------------------------Taglia: S/M - L/XL - XXL/XXXL
    Materiali: DROPS PUDDEL di Garnstudio
    200-250-250 g colore n 07, grigio medio

    DROPS FERRO CIRCOLARE N 7 (80 cm) - oppure i ferri necessari per ottenere un campione di 10 m x 20 f = 10 X 10 cm al punto legaccio.
    ACCESSORI: ca 1,5-2 metri di nastro di seta (ca 5 cm altezza).


    PUNTO LEGACCIO (avanti e indietro sul ferro):

    Lavorare tutti i ferri a diritto.
    --------------------------------------------------------

    MANTELLA:
    Si lavora avanti e indietro sul ferro circolare.
    Avviare 120-135-150 m con il ferro circolare 7 ed il filo Puddel. Lavorare a PUNTO LEGACCIO - ved spieg sopra. Quando il lavoro misura 7-8-8 cm, distribuire uniformemente 12-15-17 diminuzioni = 108-120-133 m. Ripetere queste diminuzioni quando il lavoro misura 15-16-17 cm e quando il lavoro misura 23-24-26 cm = 84-90-99 m. Quando il lavoro misura 30-32-34 cm distribuire uniformemente 14-15-19 m diminuzioni = 70-75-80 m. Al ferro seguente, lavorare un giro a punto traforato per infilare il nastro di seta così: 2-2-3 m dir, * 2 m insieme a dir, 2 gett, 6-5-7 m dir *, ripetere da *-* finché non rimangano 4-3-5 m e terminare con 2 gett, 2 m insieme a dir e 2-1-3 m dir. Al f seguente, lasciar cadere 1 gett e lavorare il 2° gett a dir (lavorare le m rimanenti a diritto come prima). Lavorare 3 f dir su tutte le m e intrecciare senza stringere, il lavoro misura ca 32-34-36 cm. Infilare il nastro di seta nel bordo traforato.
    Ultima modifica di mammagiulietta; 22-06-2012 alle 16:37

  5. #55
    L'avatar di manuela62
    manuela62 è offline Crocettina Platinum
    Data Registrazione
    30-03-2010
    Messaggi
    6,415
    Grazie
    1,655
    Ringraziato 2,061 volte in 1,467 Discussioni

    Predefinito

    da manuela62

    Anteprime Allegate


  6. Per questo Post, l'utente manuela62 e' stato ringraziato da:

    laura1955 (01-10-2011)

  7. #56
    L'avatar di manuela62
    manuela62 è offline Crocettina Platinum
    Data Registrazione
    30-03-2010
    Messaggi
    6,415
    Grazie
    1,655
    Ringraziato 2,061 volte in 1,467 Discussioni

    Predefinito

    Anteprime Allegate


    da manuela62


  8. #57
    L'avatar di mammagiulietta
    mammagiulietta è offline Moderatore Globale
    Data Registrazione
    24-01-2010
    Località
    pisa
    Messaggi
    7,067
    Grazie
    3,069
    Ringraziato 7,215 volte in 2,556 Discussioni

    Predefinito robes


    il mio blog http://hilda-bastaunfilo.blogspot.com/


    "Ridi sempre, ridi, fatti credere pazzo ma mai triste. Ridi anche se ti sta crollando il mondo addosso, continua a sorridere. Ci sono persone che vivono per il tuo sorriso e altre che rosicheranno quando capiranno di non essere riuscite a spegnerlo." Roberto Benigni

  9. #58
    L'avatar di mammagiulietta
    mammagiulietta è offline Moderatore Globale
    Data Registrazione
    24-01-2010
    Località
    pisa
    Messaggi
    7,067
    Grazie
    3,069
    Ringraziato 7,215 volte in 2,556 Discussioni

    Predefinito robes


    il mio blog http://hilda-bastaunfilo.blogspot.com/


    "Ridi sempre, ridi, fatti credere pazzo ma mai triste. Ridi anche se ti sta crollando il mondo addosso, continua a sorridere. Ci sono persone che vivono per il tuo sorriso e altre che rosicheranno quando capiranno di non essere riuscite a spegnerlo." Roberto Benigni

  10. I seguenti 2 utenti ringraziano mammagiulietta per questa discussione:

    allenotna (12-01-2011)

  11. #59
    L'avatar di Lo Staff
    Lo Staff è offline Moderatrice
    Data Registrazione
    11-12-2011
    Messaggi
    17,463
    Grazie
    0
    Ringraziato 14,960 volte in 6,540 Discussioni

    Predefinito

    Crystal Palace Yarns

    free knit pullover pattern


    Eyelet Cloverleaf Pullover
    in Mochi Plus

    Materials
    Models shown in 3 different colors of Mochi Plus

    Description: This stylish sweater features a large cloverleaf pattern on back, front and sleeves. It has wide garter stitch edging, is slightly cropped and has set-in cap sleeves for maximum ease at the armhole.
    Level: Intermediate
    Size: S (M, L)
    Finished Chest (after sewing seam): 36 (40, 44)”
    Finished Length (from armhole shoulder edge to bottom): 19.25 (20.25, 21.25)”
    Materials:
    9 (10, 11)* – 50g balls Crystal Palace Mochi Plus (Shown here in 3 different colors, Size M)
    Crystal Palace Bamboo 12" SP US size #8 and 9 and 16” circular size #8 (or size needed to obtain gauge)
    Yarn needle

    *These quantities leave very little yarn for error. It is often a good idea to buy an extra ball of yarn in the same dye lot to allow for slight gauge and yardage variation.
    Gauge: 4 sts and 6 rows= 1” over St st on larger needles
    Abbreviations: beg- beginning; BO- bind off; CO- cast on; garter st- When knitting back and forth, knit all rows. When knitting in the rnd, alternate purl and knit rounds; k- knit; p- purl; patt- pattern; pu- pick up; rem- remaining; rnd- round; RS- right side (outer side of garment); St st- stockinette stitch; st(s)- stitch(es); WS- wrong side (inside of garment)
    4-Leaf Chart: Click here for chart page
    IMPORTANT NOTE:
    For the BACK and FRONT of the sweater, you will be working on chart Stitches 1-28 repeated twice for a total of 56 sts across.
    For the SLEEVES of the sweater, you will be working on chart Stitches 17-40 for a total of 24 sts.
    Instructions:

    Back:
    With smaller needles, CO 74 (82, 90) sts. Knit every row (garter stitch) for 22 rows, ending with a WS row. Change to larger needles and St st and work 7 (7, 9) rows.
    Keeping 9 (13, 17) sts in St st on each side, work Rows 1-34 of chart over center 56 sts twice (see IMPORTANT NOTE at beg of patt), and AT THE SAME TIME, when you have knit 42 (44, 44) rows of chart [piece should measure approx. 12.25 (12.5, 13)” from beg], begin armhole (starting with RS row): BO 4 (6, 8) sts at the beg of next 2 rows. Then BO 2 sts at the beg of next 2 rows. Then BO 1 st at the beg of next 2 rows. Work 2 rows even. Then BO 1 st at beg of next 2 rows. Work 2 rows even. Then BO 1 st at beg of next 2 rows. [56 (60, 64) sts rem]
    Work even in St st over 0 (2, 4) sts on sides while working chart patt over center 56 sts until you have worked 68 rows total of chart. Change to St st only and work even until piece measures 7 (7.5, 8)”, ending with a WS row. [You should have worked 40 (44, 48) rows total of armhole.] Begin neck and shoulder shaping.
    Shape Neck and shoulders: Work 17 (18, 19) sts, turn. Continuing on these sts only, BO 4 st at beg of next row (at neck edge). BO 3 sts at beg of next row (at arm edge). BO 3 sts at beg of next row (at neck edge). BO 3 sts at beg of next row (at arm edge). Work one row even. BO rem 4 (5, 6) sts.
    Join yarn on RS and BO center 22 (24, 26) sts. Work last 17 (18, 19) sts, turn. Work next row even. BO 4 st at beg of next row (at neck edge). BO 3 sts at beg of next row (at arm edge). BO 3 sts at beg of next row (at neck edge). BO 3 sts at beg of next row (at arm edge). Work one row even. BO rem 4 (5, 6) sts.
    Front:
    Work as for back until you have completed 68 rows of chart. Change to St st only and work even until piece measures 16.75 (17.75, 18.75)” from beg, ending with a WS row. [For size S, you will begin neck and shaping immediately after finishing the chart.] Begin neck and shoulder shaping.
    Shape Neck and shoulders:
    Continuing in St st, work 22 (23, 24) sts, turn. BO 3 sts at beg of next row (at neck edge). Work next row even. BO 2 sts at beg of next row (at neck edge). Work next row even. BO 2 sts at beg of next row (at neck edge). Work next row even. BO 1 st at beg of next row (at neck edge). Work next row even. BO 2 sts at beg of next row (at neck edge). Work 3 rows even. BO 1 st at beg of next row (at neck edge). BO 3 sts at beg of next row (at arm edge). BO 1 st at beg of next row (at neck edge). BO 3 sts at beg of next row (at arm edge). Work next row even. BO rem 4 (5, 6) sts.
    Join yarn and BO center 12 (14, 16) sts. Work 22 (23, 24) sts, turn. Work next row even. BO 3 sts at beg of next row (at neck edge). Work next row even. BO 2 sts at beg of next row (at neck edge). Work next row even. BO 2 sts at beg of next row (at neck edge). Work next row even. BO 1 st at beg of next row (at neck edge). Work next row even. BO 2 sts at beg of next row (at neck edge). Work 3 rows even. BO 1 st at beg of next row (at neck edge). BO 3 sts at beg of next row (at arm edge). BO 1 st at beg of next row (at neck edge). BO 3 sts at beg of next row (at arm edge). Work next row even. BO rem 4 (5, 6) sts.
    Sleeves (make 2):
    With smaller needles, CO 38 (42, 46) sts. Work garter st for 22 rows, ending with a WS row.
    Begin sleeve shaping:
    Change to larger needles and work the next 21 rows in St st, then 68 rows of chart (see IMPORTANT NOTE at beg of patt), then St st to end of sleeve. AT THE SAME TIME, inc 1 st at each end of every 13th row once, then at each end of every 8th (10th,10th) row once, then at each end of every 6th row 7 times [56 (60, 64) sts]. Work 6 rows even.
    Begin cap shaping: BO 3 (4, 5) sts at the beg of next 2 rows. Work 0 (2, 2) rows even. Then BO 2 sts at the beg of next 2 rows. Work 0 (0, 2) rows even. Then BO 1 st at beg of next 2 rows 3 times. Then BO 2 sts at the beg of next 2 rows. Then BO 1 st at beg of next 2 rows 6 times. Then BO 2 sts at beg of next 2 rows. Then BO 3 sts at beg of next 2 rows. Work 1 row even. BO rem 14 (16, 18) sts.
    Finishing:
    Sew side and shoulder seems. Sew sleeve caps into armhole.
    Collar:
    With 16” circular needles, PU 12 (14, 16) center front sts, PU 18 sts from front side of collar, PU 9 sts from back side of collar, PU 22 (24, 26) center back sts, PU 9 sts from other back side of collar, PU 18 sts from other front side of collar [88 (92, 96) sts]. Join yarn and begin working in the round. Work 12 rows of garter as follows: (p one rnd, k one rnd) 6 times. BO all sts. Weave in all ends.


    Ultima modifica di mammagiulietta; 22-06-2012 alle 16:39

  12. #60
    L'avatar di Lo Staff
    Lo Staff è offline Moderatrice
    Data Registrazione
    11-12-2011
    Messaggi
    17,463
    Grazie
    0
    Ringraziato 14,960 volte in 6,540 Discussioni

    Predefinito

    Ultima modifica di mammagiulietta; 22-06-2012 alle 16:39 Motivo: tolto firma

  13. Per questo Post, l'utente Lo Staff e' stato ringraziato da:

    tastierina (12-04-2012)

Pagina 6 di 17 PrimaPrima ... 4567816 ... UltimaUltima

Discussioni Simili

  1. Risposte: 3
    Ultimo Messaggio: 07-03-2013, 10:53
  2. Giacche donna
    Di elviral nel forum Cartamodelli e Schemi
    Risposte: 2
    Ultimo Messaggio: 26-05-2012, 09:18
  3. Louisa Harding - Cardigan - donna
    Di Nick-name nel forum La libreria della maglia
    Risposte: 33
    Ultimo Messaggio: 22-09-2011, 23:03
  4. schema cardigan uncinetto per donna
    Di xalexa nel forum Richieste Uncinetto
    Risposte: 7
    Ultimo Messaggio: 15-07-2011, 14:57

Segnalibri

Segnalibri

Permessi di Scrittura

  • Tu non puoi inviare nuove discussioni
  • Tu non puoi inviare risposte
  • Tu non puoi inviare allegati
  • Tu non puoi modificare i tuoi messaggi
  •